ohGator XL

3D Printable Assembly & Demo Videos

ohGator Logo

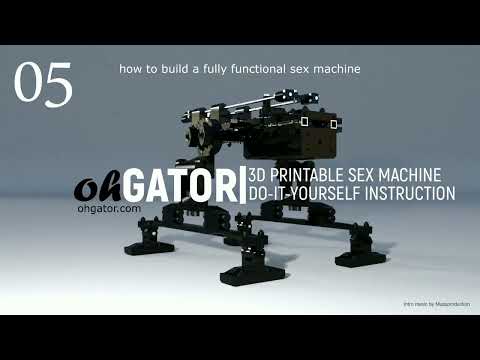
This page contains a complete set of step-by-step assembly videos for the ohGator XL project. The videos guide builders through the process of assembling the components, showing how parts fit together and how the full assembly is built in a logical sequence.

Each video corresponds to a specific stage of the assembly process. They focus on correct placement, orientation, and connection of components, demonstrating how subassemblies are formed and integrated into the overall structure. The videos serve as a visual reference, similar to a traditional step-by-step instruction manual.

The videos cover the installation of main structural elements, mechanical linkages, motion components, and supporting parts. They illustrate how components interact mechanically once assembled, helping builders ensure that each step is completed accurately.

These assembly videos are intended to complement the written documentation and provide clear visual guidance for completing the full build. By following the sequence, builders can understand the structure of the project, how parts connect, and how the system functions as a complete assembly.

Skip to Videos
  • ohGator XL Assembly (Part 1): Sliding System
    8/29/25

    ohGator XL Assembly (Part 1): Sliding System

    The sliding mechanism is the core motion system of the project. It converts the motor’s rotary motion into a smooth, linear motion, driving the moving assembly forward and backward in a controlled and repeatable way. The mechanism is designed for stability, consistent stroke length, and adjustable speed, ensuring reliable operation.

  • ohGator XL Assembly (Part 2): Stand Base Attachment
    1/9/26

    ohGator XL Assembly (Part 2): Stand Base Attachment

    This component connects the main assembly to the base using legs. It acts as a rotational pivot, allowing the assembly angle to be adjusted and then locked in a selected position. The design provides a secure mechanical connection while maintaining stability and smooth adjustment.

  • ohGator XL Assembly (Part 3): Motor and Reduction Gear Installation
    1/9/26

    ohGator XL Assembly (Part 3): Motor and Reduction Gear Installation

    This section explains how to install the motor and reduction gear as part of the assembly. It describes how the motor is mounted to the frame, how the reduction gear is attached, and how rotational motion is transferred from the motor to the reciprocating mechanism. The focus is on correct positioning, alignment, and secure mechanical connections required during the DIY build process.

  • ohGator XL Assembly (Part 4): Legs Spacing Support & Inclination Wheel
    1/9/26

    ohGator XL Assembly (Part 4): Legs Spacing Support & Inclination Wheel

    This section describes the legs and the inclination wheel used to connect them to the stand base. It explains how the legs are positioned and spaced, and how the inclination wheel fits between the legs and the stand base. The focus is on part geometry and spacing to ensure the printed components fit together correctly and assemble smoothly.

  • ohGator XL Assembly (Part 5): Legs and Feet
    1/9/26

    ohGator XL Assembly (Part 5): Legs and Feet

    This section explains how to print the legs and feet that support the assembly and carry its weight. It describes the intended orientation of the printed parts, their fit, and how the feet attach to the legs. It also covers the installation of abrasive pads on the feet, which increase friction with the surface and help reduce unwanted movement.